Escaping IBM Rational Products: Simple Java EE Web Application Development with Eclipse
November 30, 2008If you work for a large enterprise you undoubtedly know the “features” of typical IBM Rational products. And if you work at a really large enterprise you likely have little freedom for deployments environments beyond Websphere. But that’s OK! For the first post in our cross-blog series “Escaping IBM Rational Products” we look at alternatives to IBM’s Rational Application Developer - keeping in mind that the result must be a file that can be easily deployed to a Websphere server once ready for production. But we can avoid having to deal with WAS in development (mostly). …not that constant crashes and consistent use of several gigabytes of memory isn’t desirable - no wait, that’s extremely undesirable. We can also save the recurring license costs associated with Rational development tools.
Get Yourself an Integrated Development Environment
Getting Eclipse - the base IDE
First thing is first - IBM’s Rational Application Developer is built on the Eclipse Foundation’s Eclipse project.. so let’s start with a clean (and working) version of Eclipse for Java EE (formerly J2EE). You can download the latest version “Helios” from the foundation directly - FREE! Eclipse is a powerful but lightweight (compared to 4.7 Gigabytes, anything is lightweight..) IDE that is easily extended for various languages and platforms. We may suggest a folder dedicated to development applications. For these examples we will be using our company issues machines that use windows, so we create a new directory: C:\Apps Edit the security on the new folder and give yourself full permissions. This will allow you and eclipse to modify the files and launch servers as needed. Extract the entire Eclipse folder under your apps directory, the result should look similar to this:
[caption id=“attachment_781” align=“aligncenter” width=“186” caption=“Custom Development Directory”]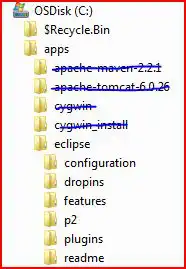 [/caption] (Don’t worry about the folders that are crossed out.. we’ll get there.) At this point you can make a shortcut of the eclipse.exe file found in the root and move it to your desktop/start menu/quick launch/etc.
Get Yourself an Application Server
Apache Tomcat
Apacht Tomcat is a simple web application server that can handle JSPs and Servlets very well. It is also very well integrated to Eclipse by default. Hit the apache site and download the latest version (Version 6.x as of this writing). You’ll want to grab the “binary distribution” for whatever version you choose. Again you will just want to extract the entire package under your “apps” directory. (nope, no need to run or configure anything, just extract..)
Running Eclipse
Now that we have an application server, and IDE we can hook them together. Start by launching eclipse.exe, or the shortcut you made earlier. When you launch it you’ll see the new welcome screen in Helios: [caption id=“attachment_782” align=“aligncenter” width=“300” caption=“Eclipse Welcome Screen”] [/caption] You can explore the new features, or click “Workbench” in the upper right to get to work! (do it..)
Connecting with Tomcat (or other Application Server)
! You will need to do this to even code JEE applications! A JRE alone is not sufficient ! Once on the workbench, you should see the perspectives you’re familiar with from RAD.
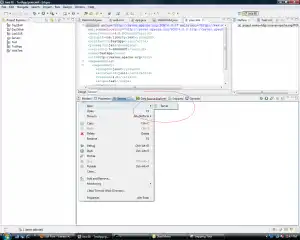
- IN the bottom view make sure the servers tab is selected.
- right-click in the empty box and choose New.. > server [caption id=“attachment_784” align=“aligncenter” width=“300” caption=“Add new Server “]
 [/caption]
 - From the resulting dialog expand the Apache heading and choose the Tomcat version that matches your download.

- Click Next again, and Finish.
Nice! now Eclipse will use Tomcat to launch web applications locally, but we still need to import the JEE Runtimes from tomcat.
Adding your Server’s Runtime ( The stuff that makes JEE work!)
- From the Windows menu option select Preferences
- In the dialog that appears, expand “Servers” and under than choose “Runtimes” [caption id=“attachment_786” align=“aligncenter” width=“300” caption=“Setting Server Runtimes”]
 [/caption]
 - Click the Add button on the right, and choose your Application Server (Tomcat) [caption id=“attachment_787” align=“aligncenter” width=“286” caption=“Choose your Application Server”]
 [/caption]
 - On the next screen, browse to the path of Tomcat (should be under your Apps folder) [caption id=“attachment_788” align=“aligncenter” width=“286” caption=“Configure your Server Runtime Path”]
 [/caption]
 - Click Finish
Woohoo - Start Building!
By this point you have a base environment ready for new web applications and a local deployment server to host them. You can test it out by making a dead simple web app:
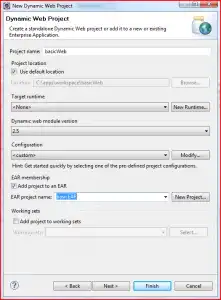
- From the File menu choose New > Dynamic Web Project
- Enter a project name “basicWeb”
- on the same page, click “add project to EAR” and name it basicEAR [caption id=“attachment_797” align=“aligncenter” width=“221” caption=“Notice the J2EE module. Must NOT be 3.0 to support Tomcat”]
 [/caption]
 - click next
- click next
- Check “generate a web.xml deployment descriptor”, click Finish. [caption id=“attachment_791” align=“aligncenter” width=“254” caption=“Generate your Descriptor!"]
 [/caption]
Your new project exists, but doesn’t do much, so we can add a simple HelloWorld servlet.
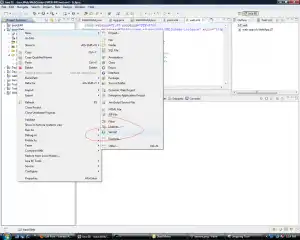
- Right-click on the project and choose new > Servlet [caption id=“attachment_792” align=“aligncenter” width=“300” caption=“New Servlet”]
 [/caption]
 - in the resulting dialog enter “servlets” as the package, and HelloWorld as the class [caption id=“attachment_793” align=“aligncenter” width=“300” caption=“Name your Servlet”]
 [/caption]
 - on the next screen, you may uncheck “doPost” as this servlet is basic
- Click Finish
Now you should have a new servlet under the src directory. Make the code should look similar to this:
package servlets;
import java.io.IOException; import java.io.PrintWriter;
import javax.servlet.ServletException; import javax.servlet.http.HttpServlet; import javax.servlet.http.HttpServletRequest; import javax.servlet.http.HttpServletResponse;
/**
-
Servlet implementation class HelloWorld */ public class HelloWorld extends HttpServlet { private static final long serialVersionUID = 1L;
/**
- Default constructor. */ public HelloWorld() { // TODO Auto-generated constructor stub }
/**
- @see HttpServlet#doGet(HttpServletRequest request, HttpServletResponse response) */ protected void doGet(HttpServletRequest request, HttpServletResponse response) throws ServletException, IOException { // TODO Auto-generated method stub PrintWriter out = response.getWriter(); out.println(“Hello World”); }
}
OK, now finally, finally we can launch it… Right-Click on the new servlet and choose Run As.. > Run on Server [caption id=“attachment_794” align=“aligncenter” width=“300” caption=“Running a Servlet”]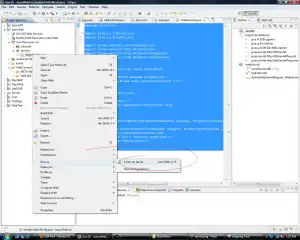 [/caption] In a few seconds you should be looking at the result:
Disclaimer
The Rational Application Developer name and other respective trademarks are the property of IBM. The opinions expressed in this article are not endorsed by IBM or any other vendors .. they are just opinions.